This documentation will guide you through setup, configuration and day-by-day use of the Magento 2 RewixSync app.
Magento 2 app is available at this URL: https://magento2.rewixsync.rewixecommerce.com/app/login
After subscribing to the RewixSync App for Magento 2 it is necessary that you contact our customer support providing information about the web address of your Magento 2 site. In this way your account on Magento 2 app will be enabled and you will be provided with the login credentials to the app.
Moreover, you should have these information:
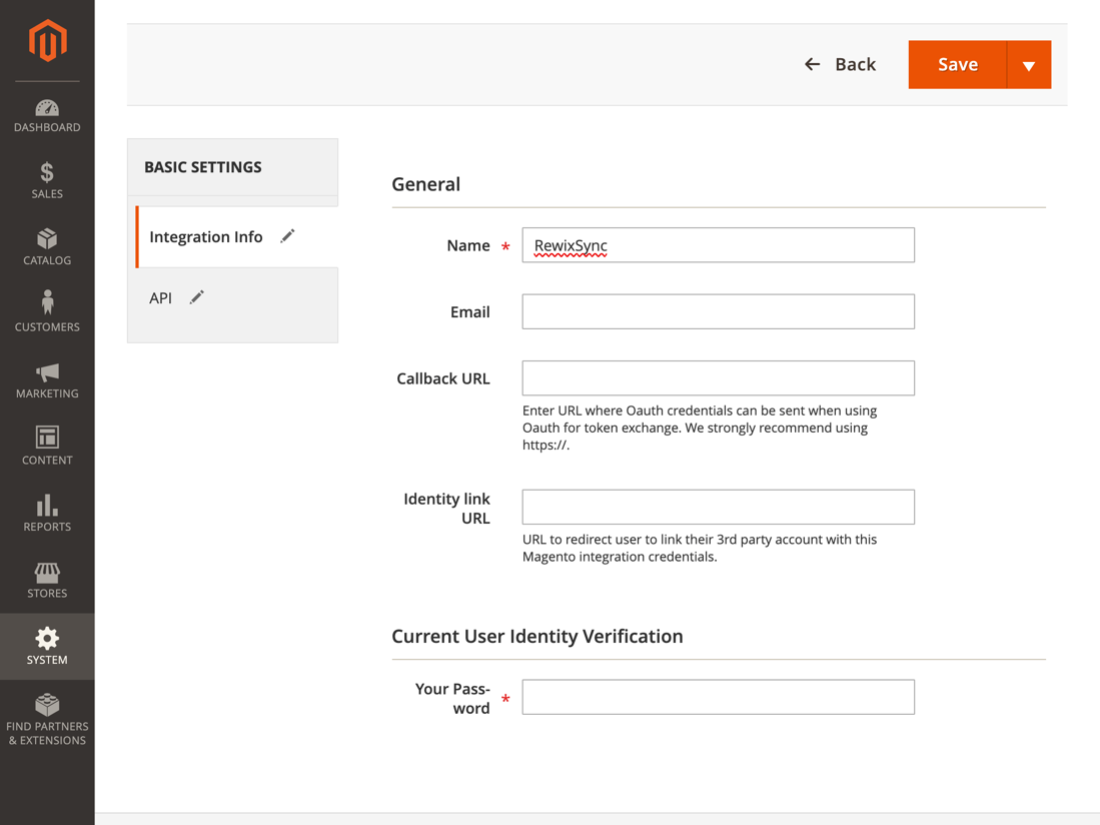
To activate the integration permissions via API it is necessary to click from the control panel of your Magento 2 store in the navigation menu System > Extension Integrations> Add new integration:
During the installation of the RewixSync app, a wizard will help you set up your first product import in your Magento 2 store.
During this procedure you can choose how to configure your Shop and then how to build your product sheets, how to organize categories and showcases.
Warning: RewixSync does not support multi-language and multi-currency sites. During the configuration phase you will then have to choose which language to import (therefore in which language the products will be imported) and which currency will be applied in the sales prices.
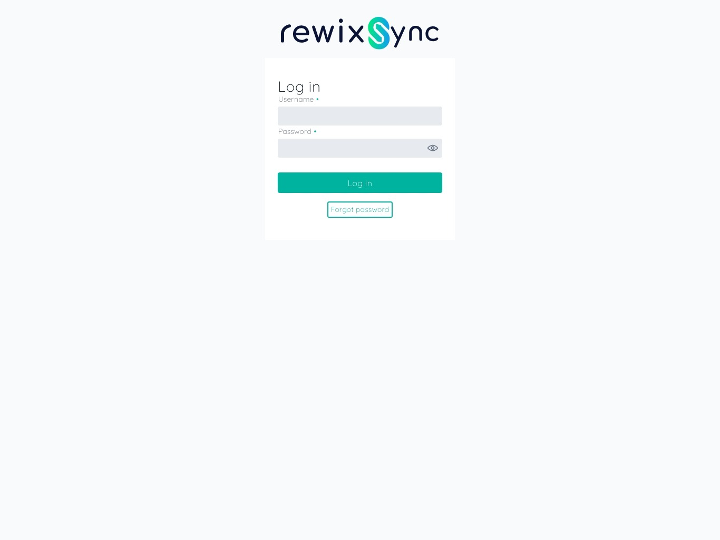
Connect via browser at https://magento2.rewixsync.rewixecommerce.com/app/login
And enter the username and password provided by customer support.
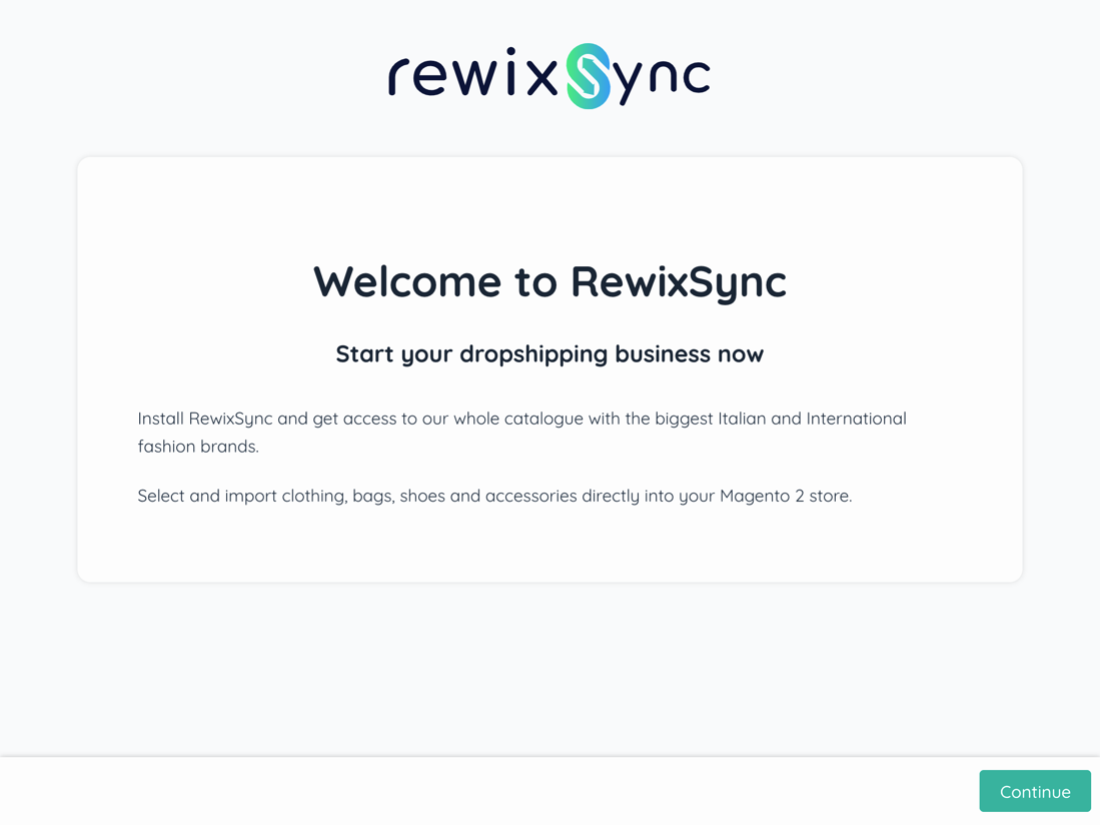
Step 0 - Welcome
During this procedure you can choose how to configure your Shop and then how to build your product sheets, how to organize categories and showcases.
To continue click on the Continue button at the bottom right.
Step 1 - Choose the supplier
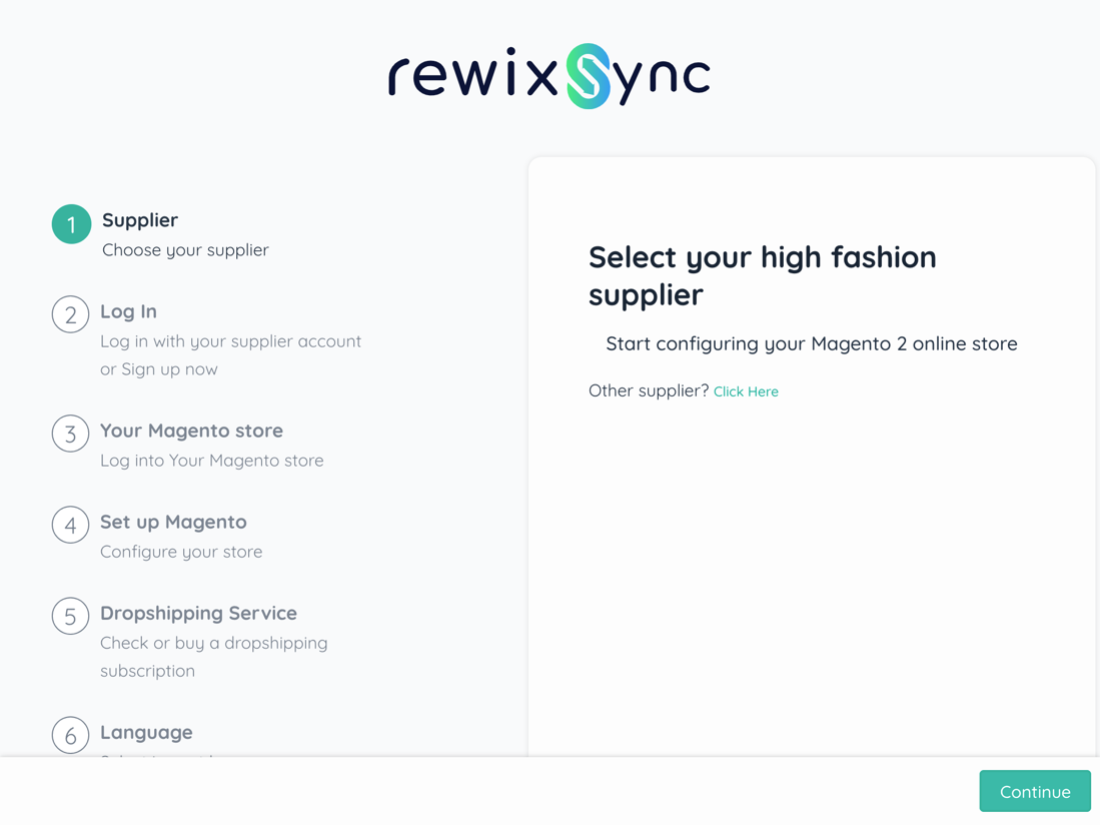
In this step you can select the Supplier with which to connect your Magento 2 site.
If the supplier is not visible in the list:
Step 2 - Login

In this step you can select the way in which to connect the RewixSync app to your account on the website of the provider you have chosen.
If you already have an account on your provider's site then you need to choose option 1:
If you do not have an account on your supplier's website, you need to register on the site before proceeding. After signing up and confirming your e-mail address, you can repeat the wizard.
Step 3 - Your Magento Store
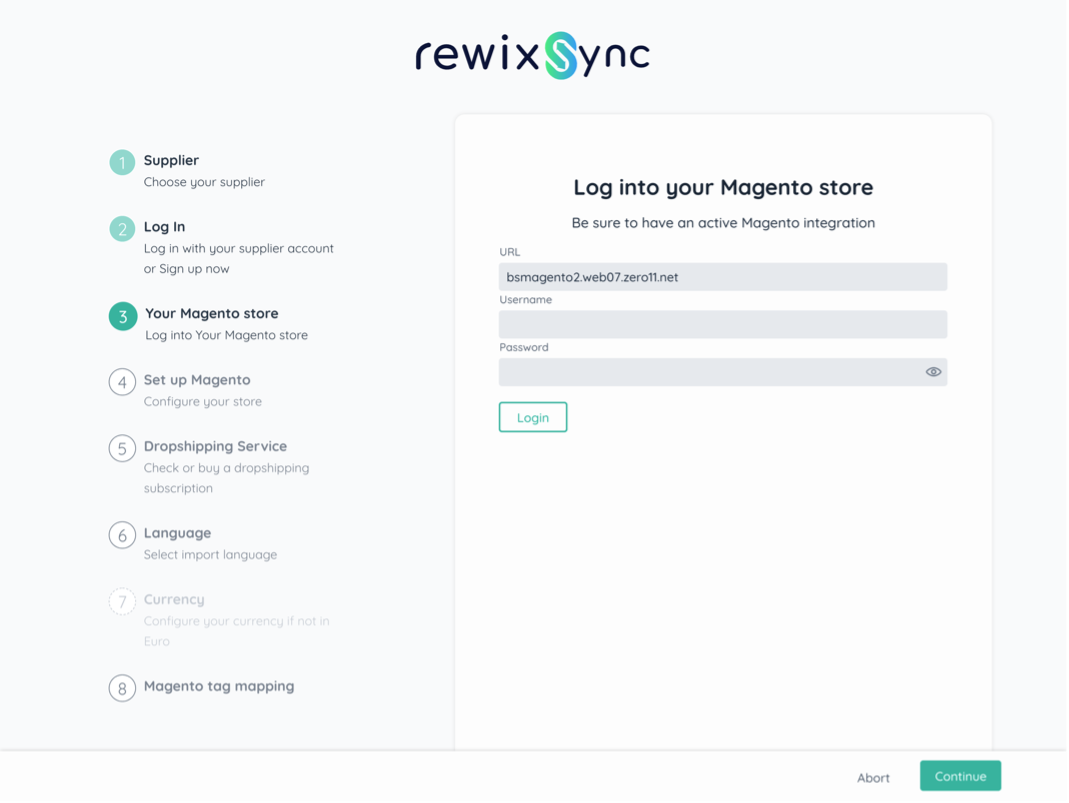
In this step you can connect the RewixSync app to your Magento 2 site:
Warning: API integration permissions must be enabled on your Magento 2 site. For more information read the chapter " How to activate API integration permissions on your Magento 2 store".
Step 4 - Magento setup
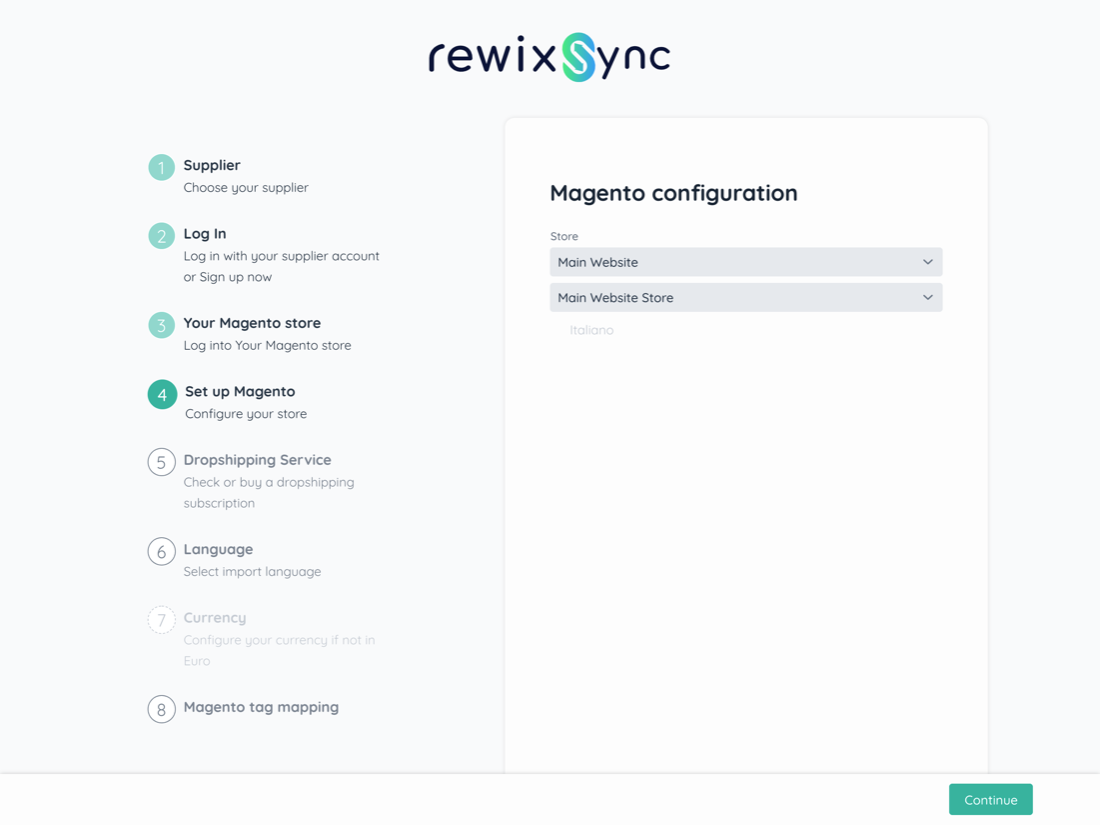
In this step you must indicate on which Store and in which language of your Magento 2 site to import the data relating to the products.
After filling in the fields you have to click on the Continue button to continue.
Step 5 - Dropshipping Service
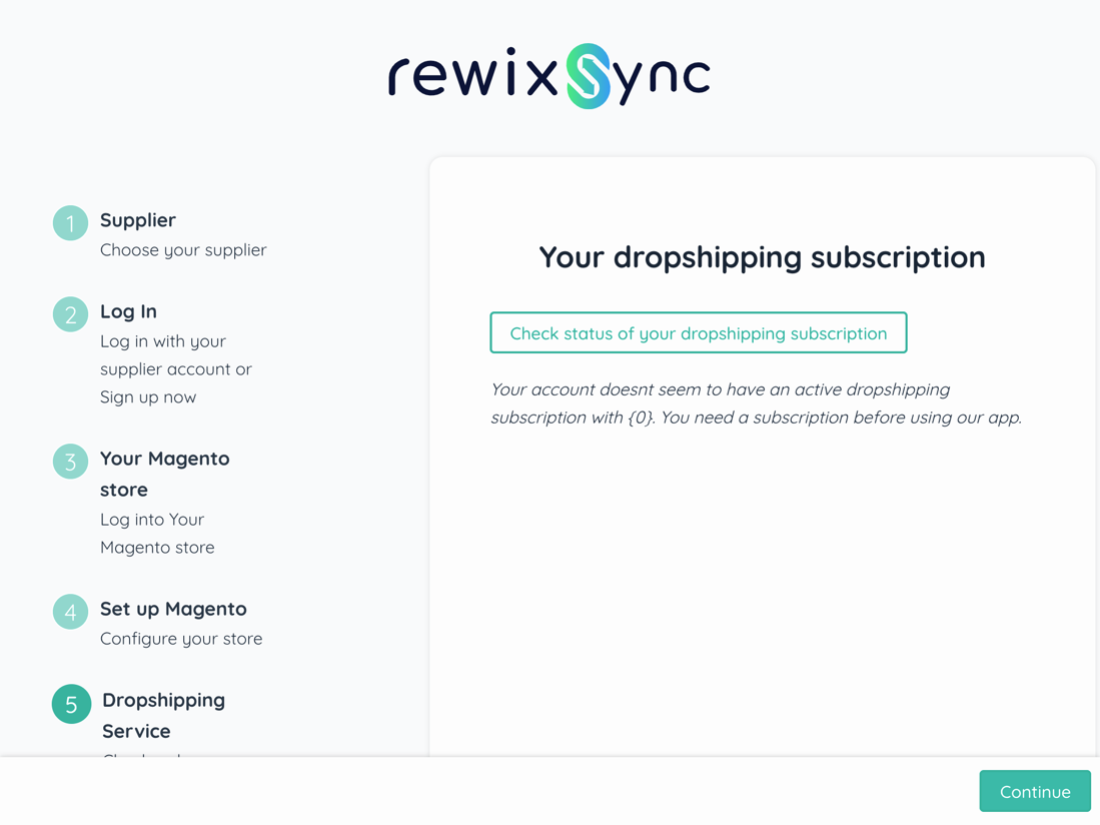
If you have already activated the dropshipping service on your supplier's website, this step is skipped and continue with Step 6.
In case you have not activated the dropshipping service on your supplier's site, you must contact your supplier's customer service in order to purchase and activate this service. After you have activated the dropshipping service you can return to this section, refresh the page and you will be directed to the next step.
Step 6 - Language
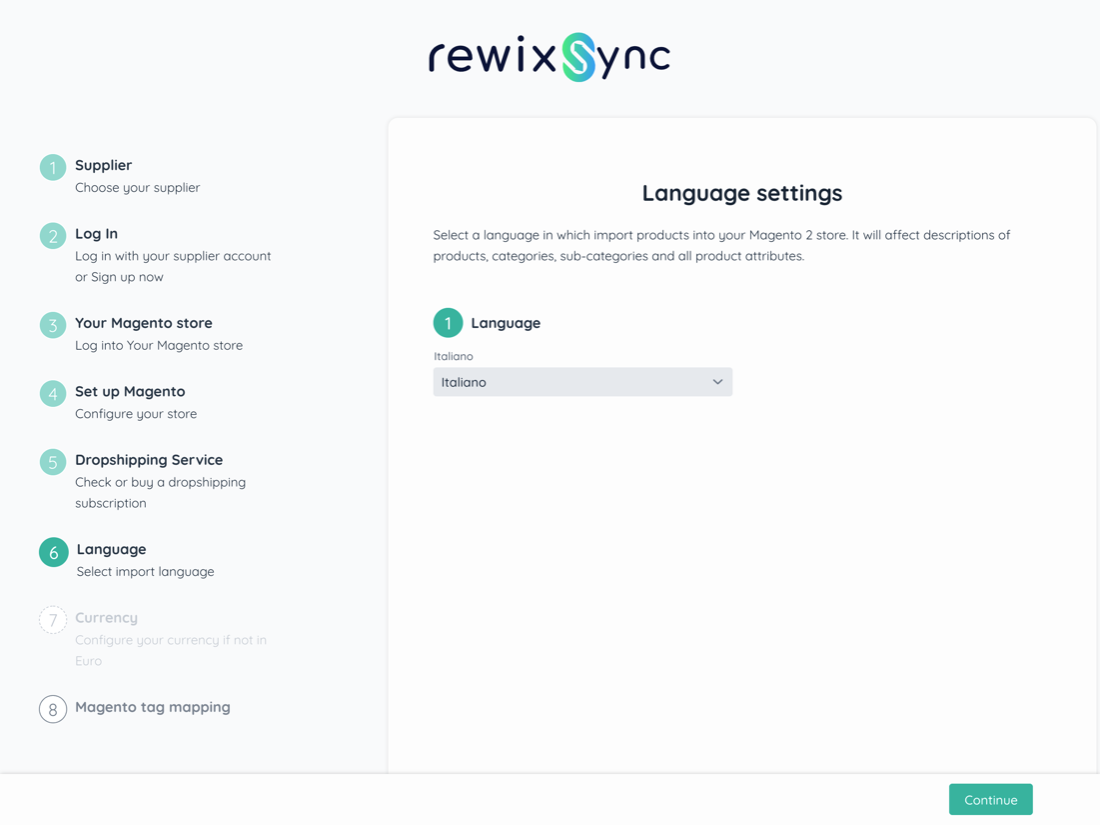
In this step you have to select the language with which to import the products on your Magento 2 site. The language choice regards product descriptions, categories, subcategories and all other product attributes:
Warning: RewixSync does not support multilingual sites. In this phase you must then choose which language to import your products.
Step 7 - Currency
In this step you have to select the currency with which to import the prices of the products on your Magento 2 site.
Warning: RewixSync does not support multi-currency sites. At this stage you have to choose which currency will be applied in the sale prices.
Step 8 - Magento tag mapping
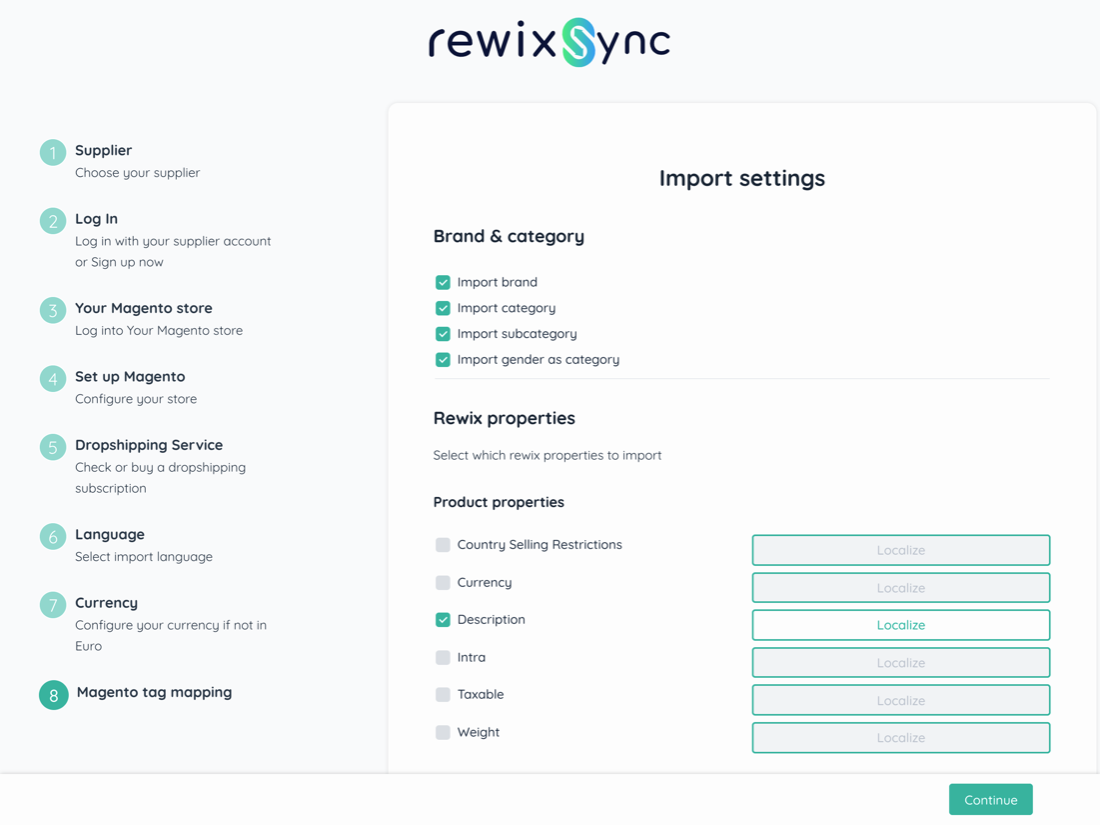
In this step you can define how to configure the attributes of the supplier's products with the attributes you have configured on your Magento 2 site.
In the Brand & category section you can select if you want to import the brand, category, subcategory and genre as a Magento product category. Choose which attributes you want to import as categories but remember that if you do not select the items indicated, the products will be imported to Magento without the associated categories.
In the Products properties section you can select which other attributes of your supplier's products you want to import into Magento.
To import an attribute is required
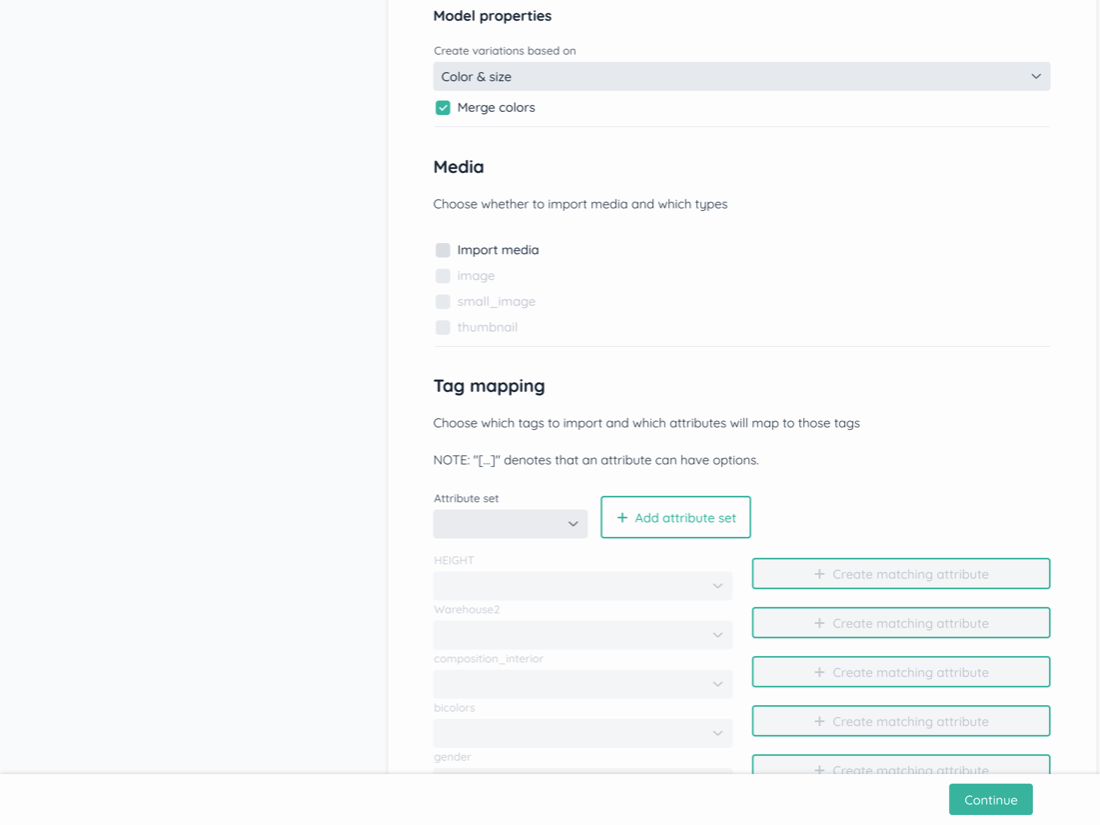
In this section you can define how to manage the size / color variants of your supplier's products on your site.
Depending on how your supplier handles product color variations, you will need to choose one of the available options. Before proceeding, we invite you to check on your supplier's website how the color variations in its catalog are managed.
Case 1: each color variant is a configurable product
In case you want each color variant to be imported to Magento as a configurable product, you must select the "Size" option. For each configurable product the sizes will be imported and associated as simple products.
Case 2: every color variants in the same configurable product
In case you want all the color variants and all the sizes to converge under the same configurable product, you must select the "Color & Size + Merge color" option. For each configurable product the sizes and colors will be imported and associated as simple products.
In this section you can decide which photos to import for each product.
In case you want to import all the photos available for each product, you need to fill in the Import media field.
Attention: if this field is not filled in, the products will be imported without photos.
After filling in the "Import media" field you can decide which types of photos to import for each product:
Your supplier's products may contain several additional attributes / tags that you can decide to import to your Magento site. In this section you can decide which other attributes to import and how to map them with the attributes that are already configured on your Magento site.
To import additional attributes it is necessary as a first step to indicate in which Attribute set of your Magento site should be imported:
After setting the Attribute set it is necessary to proceed with the mapping of the attributes.
In this section you will find the list of all available attributes / tags.
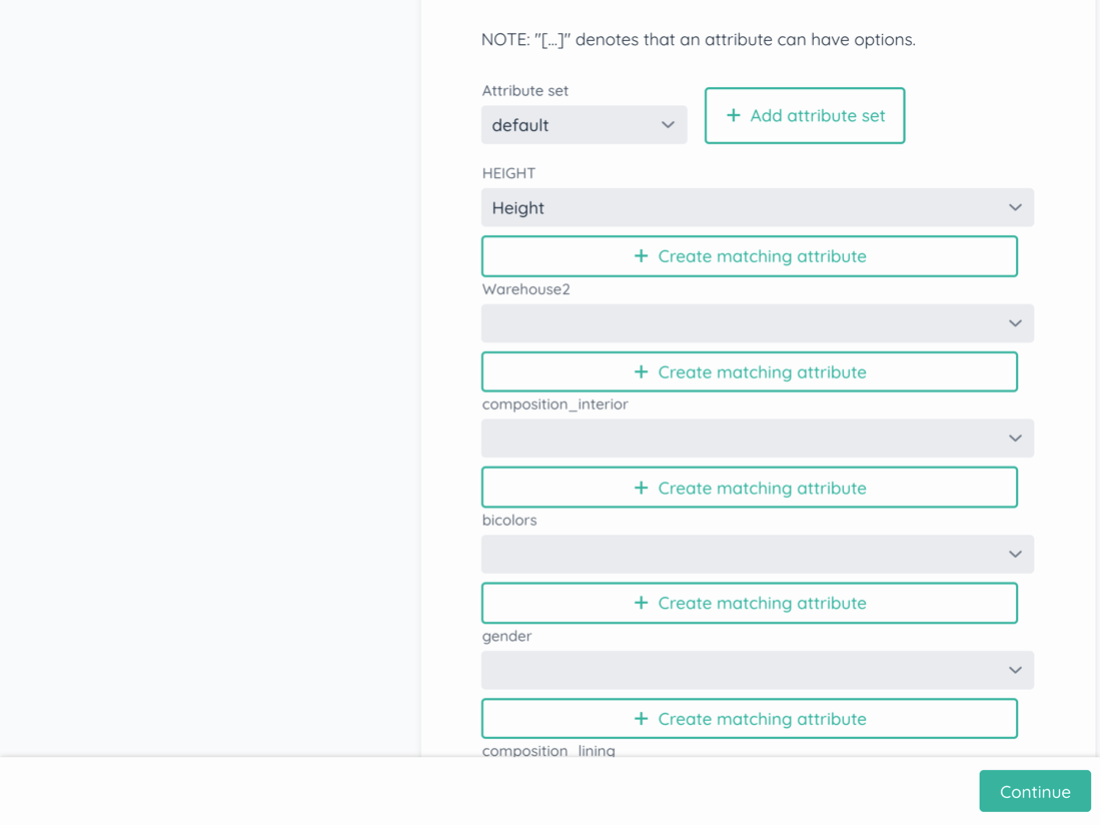
For example, if you want to import the "composition" of a product you need:
If the attribute is not available in the selected Attribute set you can Create a new attribute:

Step 9 - Configuring sales prices
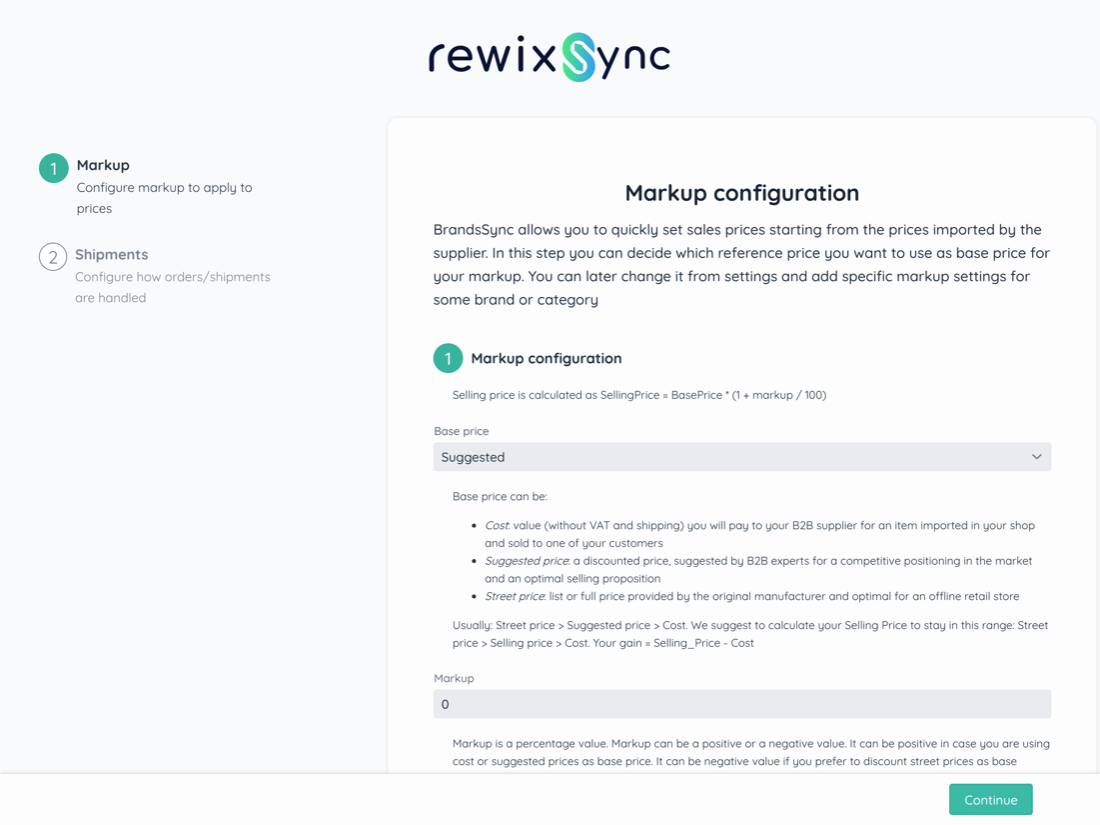
RewixSync for Magento 2 allows you to quickly and easily set sales prices starting from the prices proposed by the supplier.
Standard prices proposed by the supplier are:
You can automatically set the calculation of your sales prices by defining a markup that is calculated on the cost of the product or on the recommended price or on the list price.
Configure your selling price starting from the cost of the product, the recommended price or the list price by choosing between options A, B and C.
To help you, here are some examples
Example 1: base price = cost of the product
Cost of the product = 30 €
If you want to set your markup for example as 100% of the purchase price from the supplier, or the cost of the product, then you will have to choose the " Cost" as the base price and your final price for your customers will become:
Selling price = Product cost + 100% * Product cost = € 60
Example 2: base price = supplier's recommended price
Recommended price = 60 €
If you want to set your markup for example as 20% of the supplier's recommended price, then you will have to choose "Suggested" as the basis price and your final price for your customers will become:
Retail price = RRP + 20% * RRP = € 72
Example 3: base price = supplier list price
List price = 90 €
If you want to set your markup for example as 10% of the list price imported by the supplier, then you will have to choose the option as base price "Streetprice" and your final price for your customers will become:
Sale price = List price + 100% * List price = € 99
If you want to be sure of a fixed margin compared to your product purchase cost, we recommend the option to follow Example 1.
Usually the cost of the product < Recommended price < List price
Your margin is given by:
Margin = Sales Price - Cost of the product
Let's now look in detail at how to configure the markup calculation.
Markup configuration (optional)
In step 2 of the configuration you will have to choose the percentage of markup that will be applied according to the rules you have established in the Base price configuration.
The percentage is indicated with a number between 0 and 100.
It will also be possible to apply percentages reserved only to some brands, to some categories, or to certain sub-categories of the catalog that you will import. These additional rules can be set later from the BrandsSync App dashboard by clicking on Pricing Rules.
Fixed amount configuration (optional)
After defining the markup, it will be possible to add or remove a fixed amount in the currency defined by the shop. The fixed amount can be an additional margin or it can be a fixed discount that you decide to apply to the whole catalog.
For example, if you had established that
Selling price = Cost price + Cost price * 50%
and you want to add a fixed amount of € 10 to the sale price, your final sale price will become:
Sale price = Cost price + Cost price * 50% + 10 €
Rounding configuration (optional)
The automatic calculation of the sale price can determine visually unattractive prices for your shop. RewixSync allows you to automatically configure the type of price rounding. In fact, it is possible to set a rounding:
The definition of the sale price is therefore automatic and immediate.
Min cost markup configuration (optional)
With this configuration it is possible to establish a minimum markup below which the sale price cannot be calculated. If for example:
Cost price = 50 €
Recommended price = 70 €
List price = € 100
Base price = Cost price
Markup = 10%
Fixed amount - 15 €
Minimum markup 5%
The automatic calculation of the selling price would have been
Selling price = cost price 50 € + 10% cost price (5 € markup) - 10 € (minimum amount) = 45 € is below the cost price!
By setting a minimum markup of 5%, the final sale price is € 52.5
Step 10. Shipments
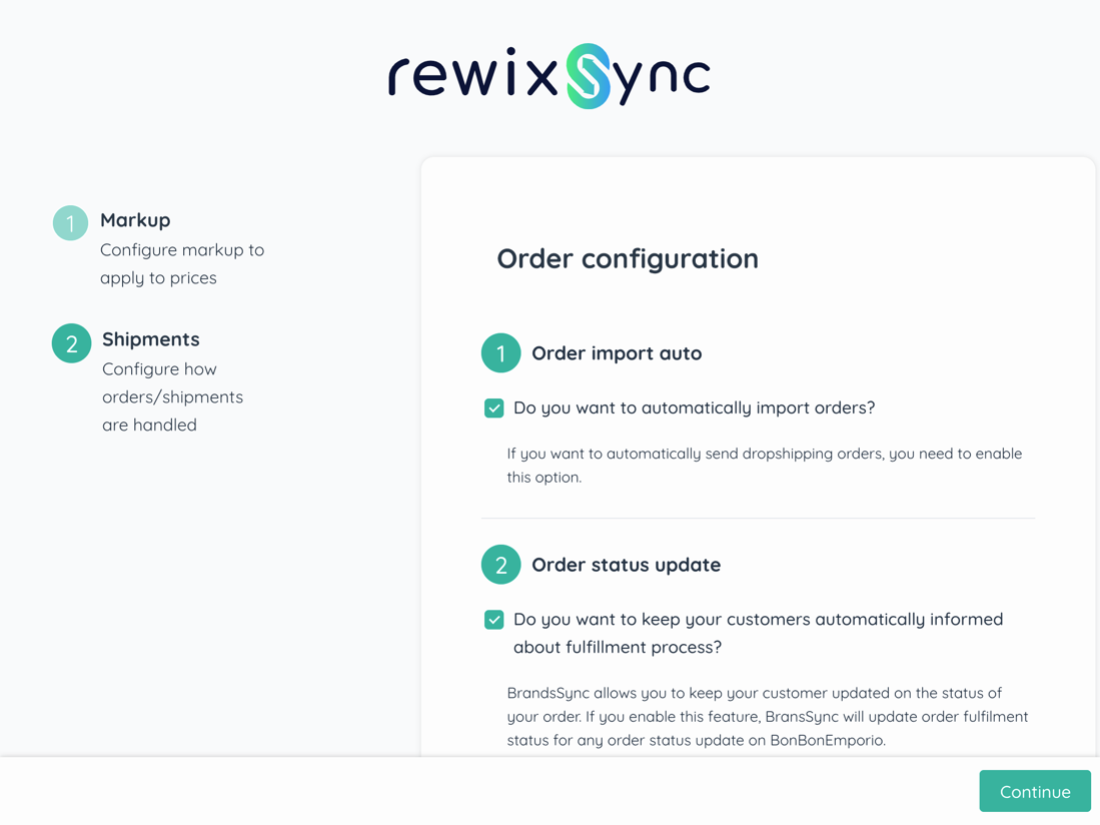
Order management is the most delicate phase of a shop's sales process. Your customer, after the purchase, expects to receive the products intact and in the shortest possible time. Communication with your customer, at this stage, must be reassuring and continuous.
For this reason, RewixSync allows you to keep your customer updated on their order status.
Auto Order import
If you want to automatically send orders to your supplier, you need to fill in this option. If this field is not filled in, you will have to manually proceed to send orders to your supplier from the Orders section of the app.
Order status update
By selecting the Status Change Notification option, you allow the RewixSync App to update the status of your Magento orders as the order is shipped.
Orders shipment
Selling with the Dropshipping mode allows you to outsource the logistics and shipping process of the goods. The product you have sold to your customer will be shipped directly from the supplier.
If you want to completely outsource the logistics and shipping process, you must NOT check the Do you want to manage the shipments directly? Box when configuring the App.
If you prefer to take care of the shipment of orders to your customers by yourself then you have to tick the flag Do you want to manage the shipments directly? and in the section below you must enter the shipping address of your warehouse where you want to receive the orders.
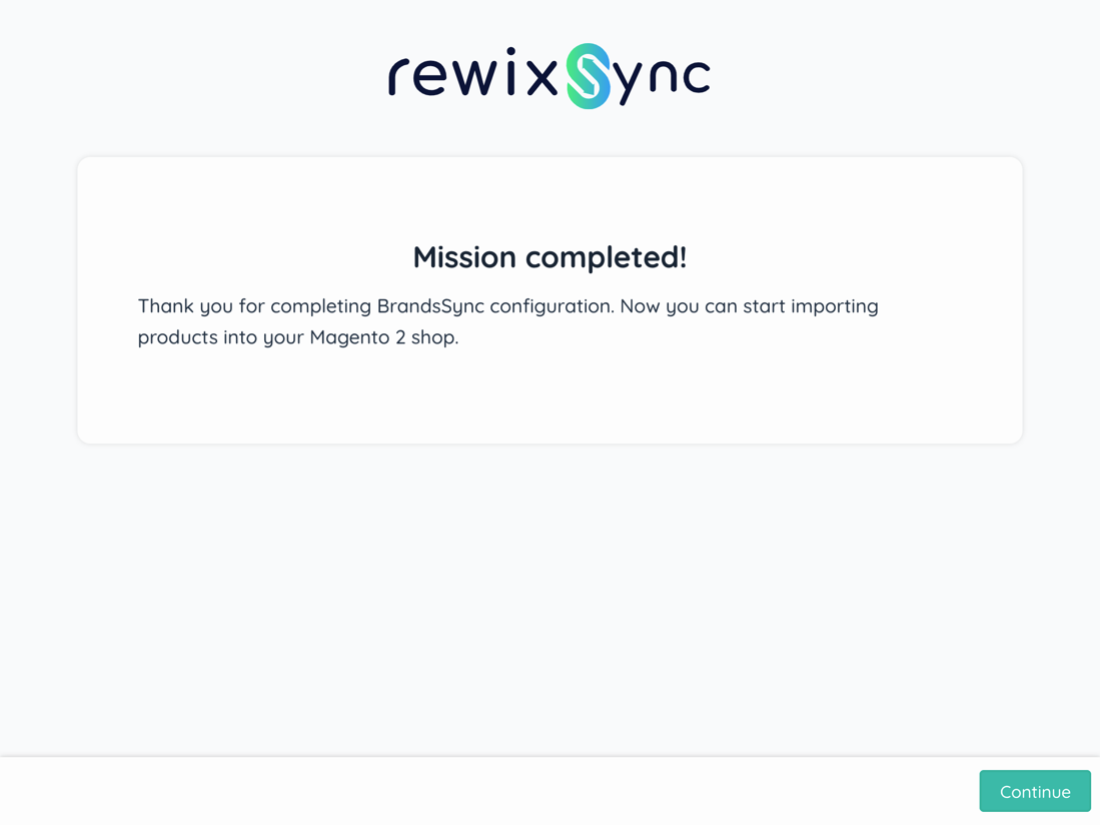
9. Wizard last step

At this point the guided configuration procedure is finished, you can click on the "Continue" button at the bottom right to enter the app.
10. How to import products
Available products
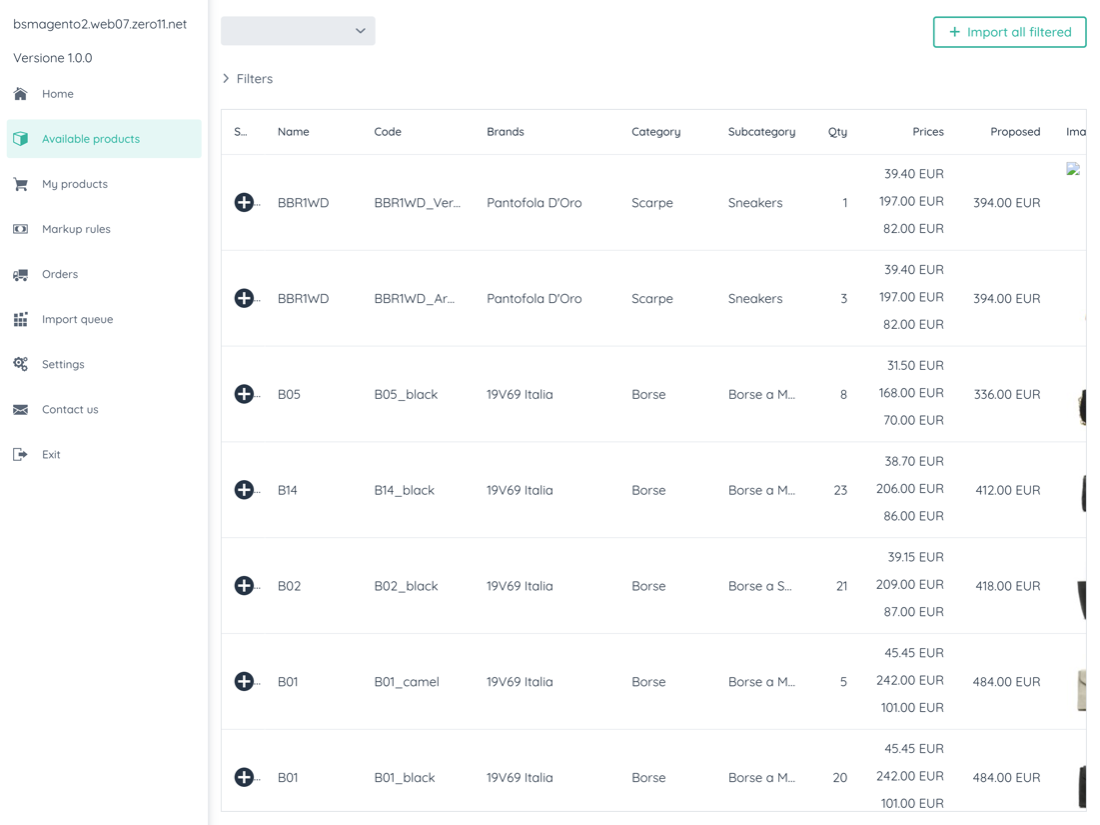
Your supplier's product catalog is available within the RewixSync app by clicking on the menu on the left under Available Products.
Through the Filters section it is possible to search for a specific product through the free search field. Or you can filter the product list by brand, category, subcategory, genre, season.
When you have identified the products you want to import, click on the "+" button under the status column of each individual product. Or, if you want to import all the products you are viewing you can click on the "Import all filtered" button.
All selected products will be placed in a queue to be imported into the Import queue section.
Import queue
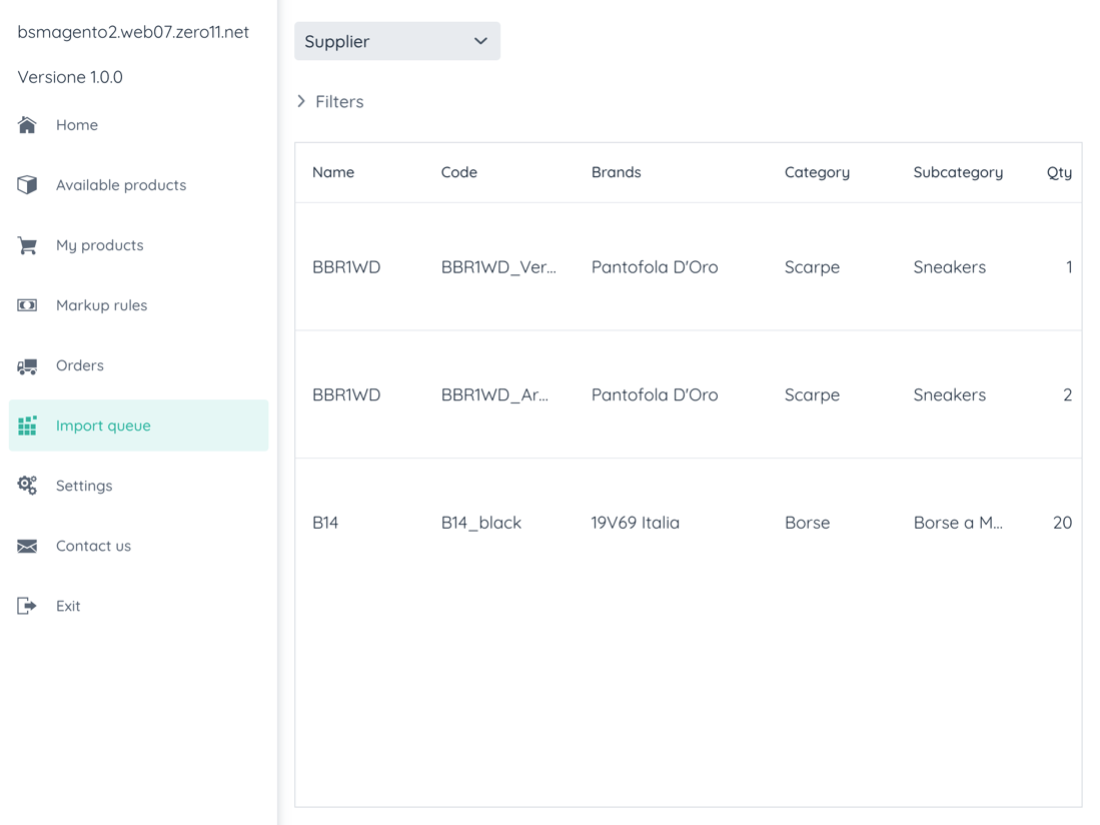
In this section you can see the list of products queued to be imported into your Magento store.
The time your products will be imported to Magento varies depending on how many products you have added to the queue.
The products imported into your Magento store will be displayed in the "My Products" section
My Products
The products imported into your Magento store are found within this section.
Through the Filters section it is possible to search for a specific product through the free search field. Or you can filter the products by brand, category, subcategory, genre, season.
The products imported into your Magento store will have the quantities and prices updated every 5 minutes.
In case a product on your supplier's site is no longer available, on your Magento site the product will be updated with zero inventory.
If your supplier has updated photos or product descriptions, you can update your products by clicking on the Reimport all filtered button.
The prices will be updated according to the previously configured markup rules. You can edit or add markup rules in the "Markup Rules" section.
11. How to manage orders on RewixSync
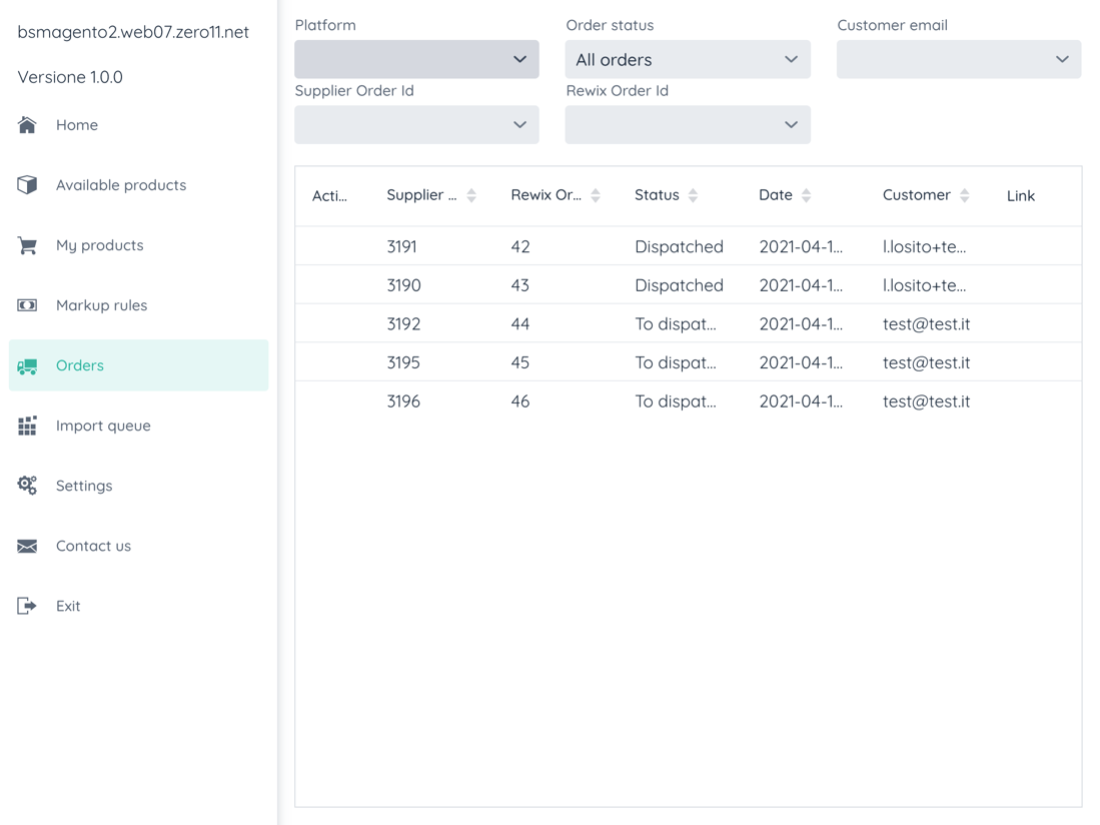
In the Orders section, all orders placed by your customers will be displayed.
In case you have chosen to automatically import orders to your supplier's site, you can use this section to track orders automatically sent to your supplier.
A confirmed / paid order on the Magento site generates an order in "BOOKED" status.
Attention: if you have chosen to manually import the orders placed by your customers, you will have to proceed to send the orders to your supplier by clicking on the "+" button under the Action column of each individual order.
How to confirm orders on the supplier's website
To confirm the order and then allow the shipment, you will need to log into your supplier's website account, in the "My orders" section, select the order to pay, click on the "Pay order" button and make the payment.
Payment of the order changes the status of the order to 'TO DISPATCHED'. When your supplier's logistics ship the order, the order status will change to 'DISPATCHED'.
Attention: if you do not pay for the order, your customer will not receive the products he has already paid for in your shop. We recommend that you check your shop orders frequently and make payments quickly on your supplier's website. In this way you will guarantee your customer to receive the purchased products with standard delivery times.
12. How to manage price rules and markup rules
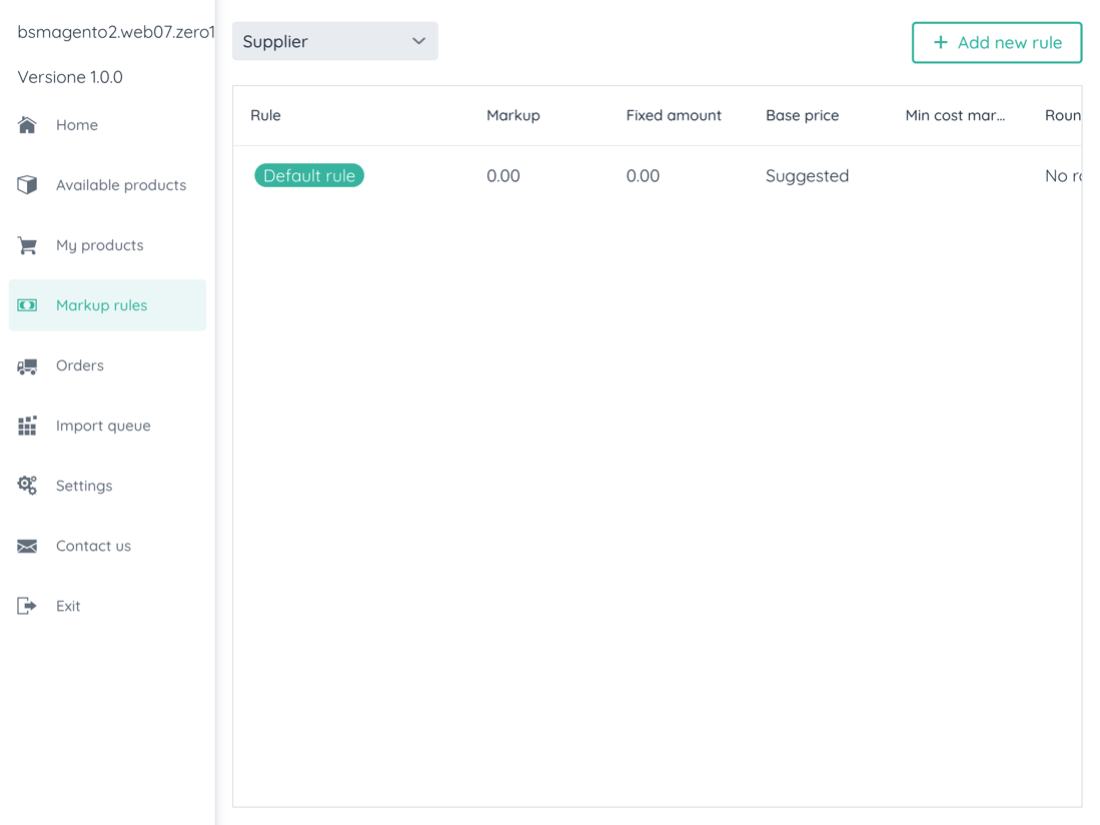
In the Markup rules section you can add or modify price and markup rules.
You can edit the "Default Rule" but you cannot delete it.
You can add a markup rule:
13. How to change Integration settings
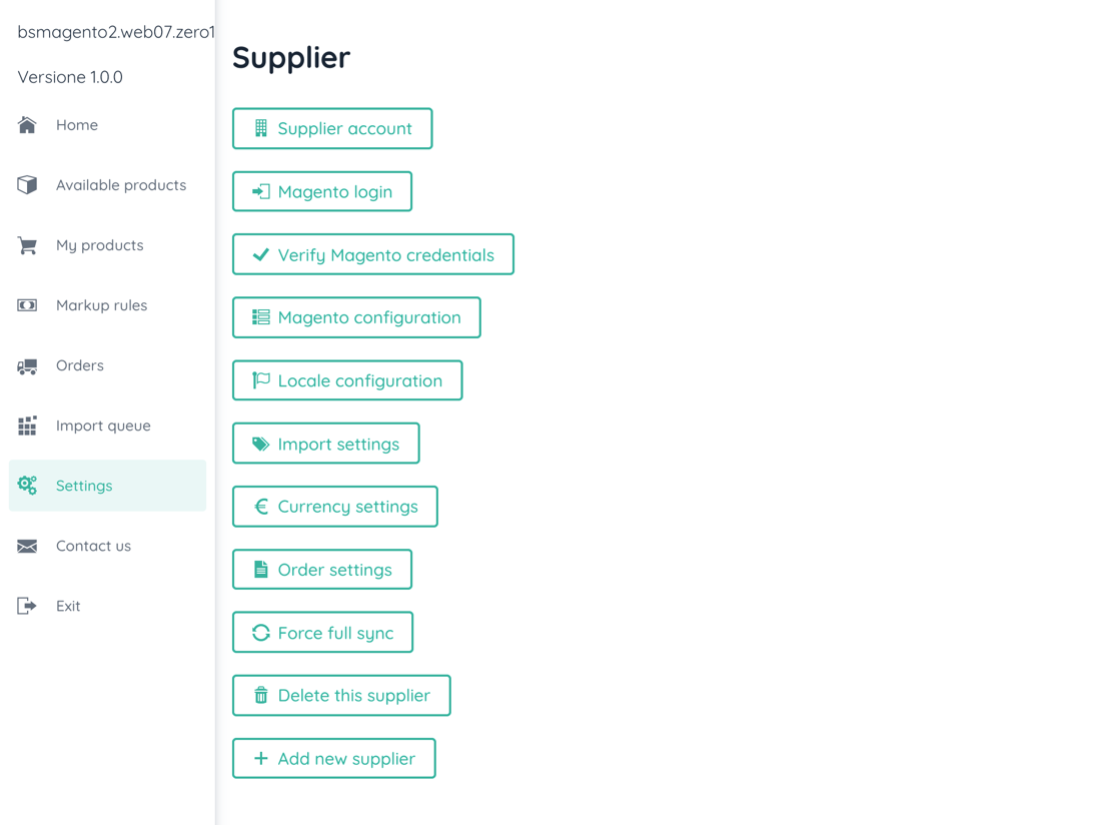
Settings area allows you to change every plugin configurations.